Evolve Medical
Respiratory therapy masks touch the nose, mouth, and surrounding skin repeatedly. Moisture, saliva, skin oils, and dust can collect around the cushion and exhalation ports. Therefore, knowing How to clean respiratory therapy masks effectively is part of safer home respiratory care.
The CDC reports that about one in 31 hospitalized patients has a healthcare-associated infection on any given day. This figure does not measure mask contamination directly. However, it shows why reusable respiratory equipment needs disciplined handling. The WHO and UNICEF 2023 WASH report also found that 1.7 billion people lacked basic hygiene services in healthcare facilities in 2022. Clean water and careful drying are not minor details.
“Clean care is safer care,” says Professor Didier Pittet, a leading infection-prevention expert associated with the World Health Organization. His principle fits mask care closely. Follow the device manufacturer’s instructions before using soap, disinfectant, heat, or sterilization. Some cushions tolerate mild detergent. Others may crack, cloud, or lose their seal.
A practical routine begins with clean hands and a separated mask. Wash removable components in lukewarm water with approved detergent. Never force liquid into electrical parts or hidden valves. Rinse away residue, then air-dry every piece on a clean towel. Inspect the seal, strap, tubing connection, and vent holes under bright light.
Look closely.
Replace damaged or permanently discolored parts according to the manufacturer’s schedule. Do not assume a visibly clean mask is hygienically safe. That is an easy mistake. Cleaning frequency also depends on usage, patient condition, humidity, and clinical advice. This guide explains the process carefully, while acknowledging that one routine cannot fit every mask or every patient.
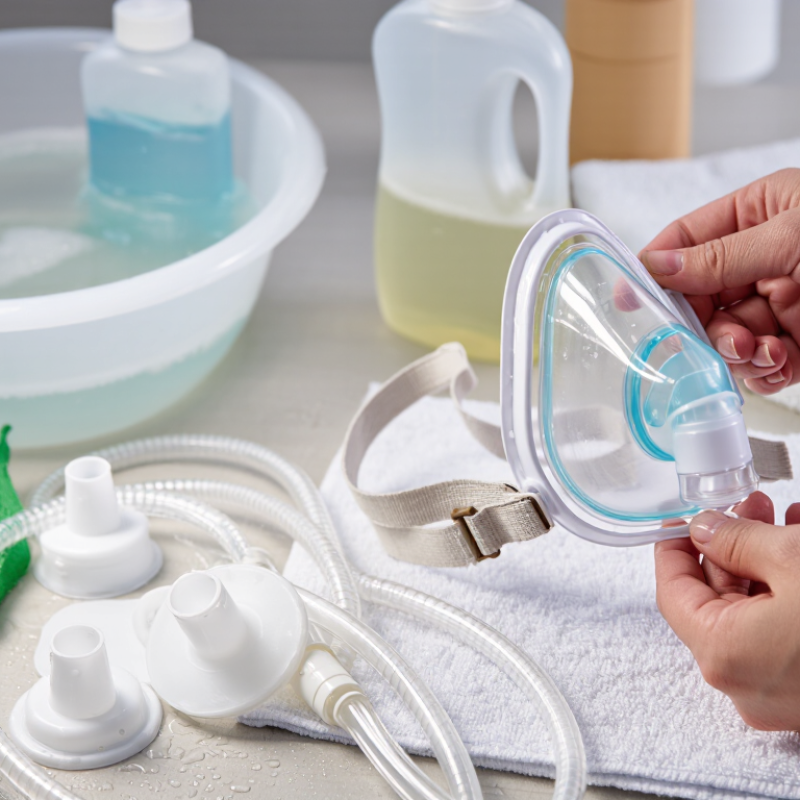
Respiratory therapy masks need material-specific cleaning. Silicone usually tolerates repeated washing, while some PVC and thermoplastic parts can harden, cloud, or deform. Check the mask body, cushion, straps, and connectors separately. Do not assume identical materials share identical limits.
ISO 17664-1 requires manufacturers to provide validated processing instructions for reusable medical devices. Follow those instructions before choosing detergent, temperature, contact time, or disinfection. Remove the mask from the therapy equipment. Disassemble detachable parts, then rinse visible residue with lukewarm water. Use a mild, non-abrasive detergent and a soft brush around vents and seams. Rinse thoroughly. Air-dry every part completely on a clean surface.
Inspect for cracks, tackiness, discoloration, blocked vents, and weakened edges. A clean appearance does not prove microbial safety. Apply the stated disinfection or sterilization process only when the material and device instructions permit it. Never use boiling water, solvents, bleach mixtures, or unapproved alcohol products. These can damage seals and leave harmful residues.
The World Health Organization’s 2022 Global Report on Infection Prevention and Control states that effective infection prevention programs may reduce healthcare-associated infections by up to 70%. Mask processing supports that goal, but inconsistent drying remains an overlooked weakness. In practice, staff may rush the final inspection. That needs correction. Record cleaning dates, detergent details, and visible damage, then replace components when instructions or inspection criteria require it.
China Best How to Clean Respiratory Therapy Masks?
Disassemble the respiratory therapy mask before cleaning. Separate the cushion, frame, straps, valves, and other removable parts. Rinse each washable component with clean water below 40°C. Warm water helps remove residue without stressing silicone or plastic. Avoid boiling water, strong solvents, and abrasive brushes. These methods may damage sealing surfaces. Keep electrical modules and tubing ends away from water unless the instructions allow immersion.
The World Health Organization reported that healthcare-associated infections affect about 7% of patients in high-income countries and 15% in low- and middle-income countries. Clean reusable equipment supports safer care, although cleaning alone may not replace disinfection. Wash parts with a mild, approved detergent when required. Rinse thoroughly until no foam remains. Air-dry components on a clean, lint-free towel. Do not reassemble them while damp. Moisture can hide inside valves. A rushed rinse is easy to miss.
Tips: Check every valve, seal, and strap for cracks after drying. Inspect the mask under bright light. Replace damaged parts according to the user instructions. Never share a mask without the required reprocessing procedure. The Centers for Disease Control and Prevention advises cleaning and reprocessing reusable medical equipment according to its instructions before another person uses it. The temperature limit may seem minor, but it is not.
China Best How to Clean Respiratory Therapy Masks?
Cleaning a reusable respiratory therapy mask starts with hand hygiene. Remove the mask carefully, then separate detachable parts if the instructions allow it. Use warm water and a small amount of mild detergent. Avoid harsh solvents, scented cleaners, and abrasive brushes. These products may weaken seals or leave irritating residue.
Wash the cushion, frame, and straps gently. Rinse every part until the water runs clear. Place the components on a clean towel and let them air-dry completely. Do not store damp parts inside a closed container. Moisture can support microbial growth. The CDC identifies cleaning and disinfection as separate infection-control steps. Its healthcare-associated infection data also reports that about one in 31 hospital patients has an HAI on any given day.
In practice, the most missed detail is drying. A quick rinse is not enough. Inspect the mask before every use. Look for cracks, cloudiness, sticky surfaces, stretched straps, or a poor seal. Replace damaged parts according to the device instructions. Never share a used mask, even after washing it. Disposable masks should not be cleaned for reuse unless the manufacturer and clinical guidance specifically permit it. The CDC’s routine method supports careful cleaning, but device instructions still control material compatibility. I would not improvise with bleach. That shortcut can damage the mask and expose the user to chemical residue.
Wash With Mild Detergent Using the CDC’s Recommended Routine Method
The chart shows the recommended cleaning sequence for reusable respiratory masks. Remove detachable parts first, wash with warm water and mild detergent, rinse thoroughly, disinfect according to the mask manufacturer’s instructions, and allow all components to air-dry completely before reassembly. Inspect the mask for damage before reuse.
China Best How to Clean Respiratory Therapy Masks?
Clean hands and prepare a clean, well-lit workspace before handling the mask. Follow the mask’s care instructions, because materials and removable parts can differ. Separate the cushion, frame, headgear, and tubing only when permitted. Wash reusable parts with lukewarm water and a mild, unscented cleanser. Avoid harsh chemicals, boiling water, and abrasive brushes. They can weaken soft materials.
Rinse every part under clean running water until no soap film remains. Pay attention to grooves around the cushion and small ventilation openings. Soap residue may irritate the skin or obstruct airflow. Shake off excess water, then place parts on a fresh, dry towel. Let them air-dry completely in a shaded, well-ventilated area. Do not use a hair dryer, radiator, or enclosed container. Heat can distort the mask’s shape.
Before reassembly, inspect the seal closely. Look for cracks, thinning edges, stiffness, discoloration, or areas that no longer feel smooth. Check straps, connectors, and valves for looseness or damage. A tiny split can cause an annoying leak. I once overlooked a hardened cushion edge because it looked clean. That was a useful reminder: cleanliness does not prove safety. Replace questionable parts according to the equipment instructions, and never force a damaged component back into place.
| Cleaning Stage | Recommended Action | Typical Timing | Important Details | Result to Confirm |
|---|---|---|---|---|
| 1. Prepare | Wash and dry your hands before handling the mask and disconnect the mask from the tubing or therapy device. | Before every cleaning session | Follow the mask and therapy-device instructions for disassembly. Keep small parts together to prevent loss. | Ready to clean |
| 2. Disassemble | Separate removable components, such as the cushion, frame, headgear, elbow, and removable exhalation parts when applicable. | According to the manufacturer’s cleaning schedule | Do not force clips, valves, or connectors. Some components are not designed to be removed by the user. | Parts identified |
| 3. Wash | Clean washable parts with warm water and a mild, fragrance-free liquid soap. | Usually daily for the mask cushion; follow the product instructions | Gently rub silicone and plastic surfaces with clean hands. Avoid abrasive pads, strong detergents, bleach, alcohol, solvents, and scented products unless specifically approved. | Visible soil removed |
| 4. Rinse | Rinse every washed component thoroughly under clean, running water. | Immediately after washing | Remove all soap residue, especially around the cushion edge, vent openings, grooves, and connectors. | No soap film |
| 5. Air-Dry | Place parts on a clean towel and allow them to air-dry completely away from direct sunlight and excessive heat. | After every wash | Do not use a clothes dryer, heater, hair dryer, or compressed air unless the instructions specifically allow it. Do not reassemble damp parts. | Fully dry |
| 6. Inspect the Seal | Examine the cushion and mask-contact surface for tears, thinning, cracks, deformation, sticky areas, or loss of flexibility. | During routine cleaning and before reassembly | A damaged or hardened seal can cause air leakage, skin discomfort, and reduced therapy effectiveness. | No seal damage |
| 7. Inspect Other Parts | Check the frame, elbow, vents, headgear, clips, valves, and connectors for blockage, discoloration, fraying, or damage. | Before reassembly and whenever performance changes | Make sure vent holes remain open. Do not insert sharp objects into small openings. | Components intact |
| 8. Reassemble | Reconnect the completely dry parts according to the device instructions. | Before the next use | Confirm that cushions, valves, elbows, and clips are seated correctly and that the headgear is not twisted. | Correct fit and connection |
| 9. Leak Check | Run the therapy device, if appropriate, and check for unusual air leakage, whistling, loose connections, or an unstable seal. | After reassembly and whenever comfort or airflow changes | Adjust the mask according to the fitting instructions. Avoid overtightening, which may worsen leaks and cause pressure marks. | Stable seal |
| 10. Replace When Needed | Replace any component that is cracked, torn, permanently deformed, excessively worn, or no longer seals properly. | Based on condition and the product’s replacement guidance | Stop using damaged parts and contact a qualified clinician or supplier if safe operation or therapy performance is uncertain. | Replace damaged parts |
Respiratory therapy masks need more than surface cleaning. Cushions and straps also require scheduled replacement. A 2022 systematic review in Sleep Medicine Reviews found that mask leakage and skin discomfort were common reasons for poor therapy adherence. Worn components can contribute to both problems. Check the manufacturer’s service interval, even when the mask looks usable. Many cushions are replaced monthly, while straps often last several months. Intervals vary.
Clean the cushion daily with warm water and mild, fragrance-free soap. Rinse away every residue. Let it air-dry on a clean towel, away from sunlight and heaters. Never reinstall a damp cushion. During routine checks, look for cloudiness, stiffness, tiny tears, stretched fabric, or a persistent odor. These details matter. A cushion may feel smooth but still leak around the nose.
Replace parts earlier after visible damage, repeated air leakage, or new morning dryness. The U.S. Food and Drug Administration advises following device instructions and avoiding unapproved cleaning chemicals. Clinical sleep equipment guidance also stresses regular inspection of patient-contact surfaces. Keep a simple replacement record. It prevents guesswork. I have seen users delay replacement because the strap still “works.” That judgment can be misleading. Fit changes gradually, and overtightening may worsen pressure marks. Service intervals are useful, but real condition should guide the final decision.
Wash your hands first. Remove the mask from the equipment. Separate detachable parts only when the instructions allow it.
Use warm water and a small amount of mild, fragrance-free detergent. Avoid solvents, abrasive cleaners, bleach mixtures, and unapproved alcohol products.
Wash each part gently. Use a soft brush around vents and seams. Rinse until the water runs clear.
Moisture inside a closed container can support microbial growth. Air-dry every part on a clean towel or another clean surface. Do not rush this step.
Look for cracks, cloudiness, tackiness, discoloration, blocked vents, stretched straps, and weakened edges. A clean appearance does not prove safe processing.
Follow the device’s service intervals, but inspect the actual condition too. Replace parts earlier after leaks, tears, stiffness, odor, or new skin discomfort.
Do not reuse it unless the device instructions and clinical guidance specifically permit reuse. Disposable materials may not tolerate washing or disinfection.
No. Silicone may tolerate repeated washing, while some plastics can harden, cloud, or deform. Check the mask body, cushion, straps, and connectors separately.
Record cleaning dates, detergent details, visible damage, and replacement dates. This reduces guesswork. I might still overlook a rushed final inspection.
How to clean respiratory therapy masks effectively begins with identifying the materials used in the mask, cushion, straps, and connectors. Always follow the manufacturer’s care instructions and applicable ISO 17664-1 cleaning guidance. Before washing, carefully disassemble the mask and rinse each removable component with clean water below 40°C to help protect sensitive materials and prevent deformation.
Wash the components using a mild, non-abrasive detergent and a gentle routine cleaning method recommended by public health guidance. Rinse thoroughly to remove all soap residue, then place the parts in a clean area to air-dry completely. Before reassembly, inspect the cushion, seals, valves, and straps for cracks, stiffness, discoloration, or other damage that could affect comfort or performance. Replace worn cushions and straps at the service intervals specified by the manufacturer, or sooner if they show visible deterioration. Consistent cleaning and inspection can support hygiene, preserve mask function, and extend the useful life of the equipment.
